AT91SAM9N12-EK Special Page
(for SAM9N12, SAM9CN12, SAM9CN11)
Introduction
|
|
| Welcome to the Linux4SAM page dedicated to the newly introduced AT91SAM9N12-EK board. - This page provides the latest information on this eMPU in the same way as elsewhere on the site Linux4SAM.
- Each component is detailed in its own section just below. As is always done for the material we published on Linux4SAM.
- This special release will be integrated in each component release cycle and the associated Open Source upstream project.
|
 |
|
|
|
Basic components
Pre-built binaries
|
|
| !BootingMedia |
Description |
Binary |
| SerialFlash |
AT91Bootstrap binary with 2nd level application in SerialFlash |
boot.bin |
| SDCard |
AT91Bootstrap binary with 2nd level application in Micro SD Card |
at91sam9n12ek-sdcardboot-3.2.bin
Rename it as BOOT.BIN while loading it on SD card. |
|
|
|
Boot capabilities matrix
Here is :

a summary of the boot feature for each board

the solution chosen for the Linux4SAM pre-built binaries.
|
|
| Product |
Boot from
SerialFlash (SPI0 CS0) |
Boot from
SerialFlash (SPI0 CS1) |
Boot from
NAND Flash |
Boot from
SD card |
Boot from
TWI EEPROM |
| AT91SAM9N12-EK |
|
|
|
|
|
|
|
|
Using AT91Bootstrap binaries
Boot from Serial Flash with AT91Bootstrap
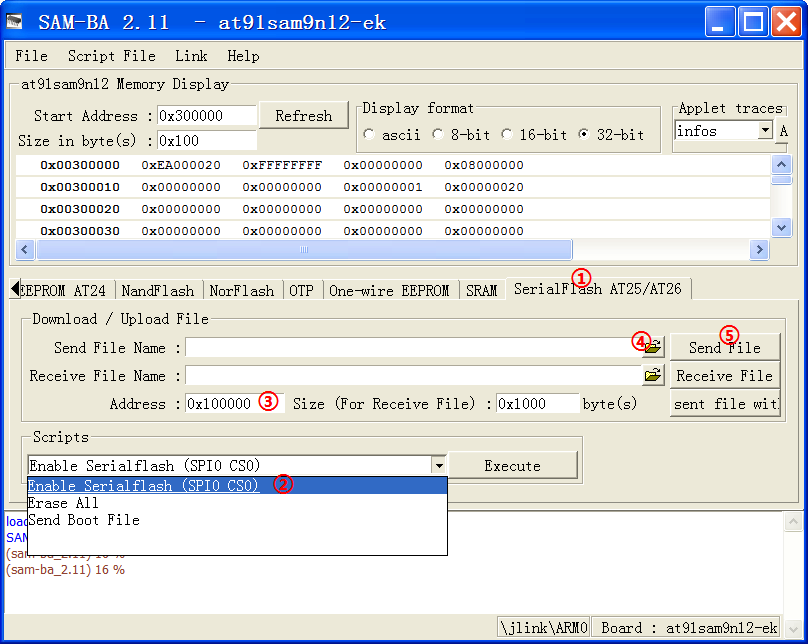
You need to use SAM-BA to flash AT91Bootstrap. Here we are assuming you want to boot from Serial Flash:

- Choose the SerialFlash AT25/AT26 tab in the SAM-BA GUI.
- Initialize the media choosing the Enable Serialflash (SPI0_CS0) action in the Scripts rolling menu and press Execute.
- Select Send Boot File in the Scripts rolling menu and press Execute. Then select the bootstrap file and press Open; the media is written down.
- Close SAM-BA, remove the USB cable.
Boot from SD card with AT91Bootstrap
You can boot from SD card. To do this, you will need an SD Card with the
first partition formated as FAT32. Then you will need to copy the AT91Bootstrap binary file and the U-Boot binary file. These files
must be respectively named
BOOT.BIN (
AT91Bootstrap image file) and
u-boot.bin (U-Boot file).
AT91Booststrap has been created by Atmel to ease the loading of binaries from several boot media. The revision created for AT91SAM9N12-EK is available on www.linux4sam.org FTP site:
at91bootstrap_9n12.tar.gz.
You can get
AT91Bootstrap source code:
$ wget ftp://ftp.linux4sam.org/pub/at91bootstrap/AT91Bootstrap3.2/at91bootstrap_9n12.tar.gz
$ tar xvzf at91bootstrap_9n12.tar.gz
$ cd at91bootstrap
Configuring AT91Bootstrap and choosing the boot media
Before building
AT91Bootstrap, you need to configure it for AT91SAM9N12-EK board and to indicate where you want your third stage bootloader to be located: in this example it will be U-Boot. If you want to run it from Serial FLASH use:
$ make at91sam9n12df_defconfig
And if you want to run it from the SD card use:
$ make at91sam9n12sd_defconfig

Note that you may need to specify the
CROSS_COMPILE variable. This will be explained later.
Then you can customize the
AT91Bootstrap configuration further with:
$ make menuconfig
Now you can cross-compile the
AT91Bootstrap:
$ make CROSS_COMPILE=<path_to_cross-compiler/cross-compiler-prefix->
<path_to_cross-compiler> is only needed if it is not in your PATH.
Usually
cross-compiler-prefix- looks like
arm-linux- ,
arm-elf- or
arm-none-linux-gnueabi- .
The result of this operation is a fresh
AT91Bootstrap binary located in the
binaries directory and called
at91sam9n12ek-xxxboot-3.2.bin corresponding to the binary ELF file called
at91sam9n12ek-xxxboot-3.2.elf.
-
at91sam9n12ek-dataflashboot-3.2.bin is the binary file able to boot the application located in Serial Flash.
-
at91sam9n12ek-sdcardboot-3.2.bin is the binary file able to boot the application called u-boot.bin located in the FAT32 formated SD card.
Check additional information in the dedicated
AT91Bootstrap page on Android4sam.
U-Boot binaries
Here are the U-Boot binaries, in this example the U-Boot environment is located into the SerialFlash.
|
|
| Booting Media |
Description |
Binary |
| !SerialFlash |
U-Boot binary with environment in SerialFlash
Based on U-Boot revision 2011.06 |
u-boot.bin |
|
|
|
U-Boot 2011.06 experimental patch
Flashing U-Boot
You will have to use SAM-BA to flash U-Boot. Here we are assuming you want to put U-Boot and its environment into the Serial Flash:

- Choose the SerialFlash media tab in the SAM-BA GUI.
- Initialize the media choosing the Enable Serialflash action in the Scripts rolling menu and press Execute.
- Specify 0x8400 as the address of the U-Boot image.
- Click the icon button to choose the U-Boot image file.
- Press Send File button.
- Close SAM-BA, remove the USB cable
Check additional information in the dedicated
U-Boot page.
Building U-Boot
Getting U-Boot source code
You need to get U-Boot source code:
$ wget ftp://ftp.denx.de/pub/u-boot/u-boot-2011.06.tar.bz2
$ tar xvjf u-boot-2011.06.tar.bz2
$ cd u-boot-2011.06
Or by using GIT:
$ git clone http://git.denx.de/u-boot.git
$ cd u-boot
$ git checkout v2011.06 -b yourbranch
Then apply the at91 AT91SAM9N12 patch:
$ wget ftp://ftp.linux4sam.org/pub/uboot/u-boot-v2011.06/u-boot-9n12_m2.patch
$ patch -p1 < u-boot-9n12_m2.patch
Configuring and Compiling U-Boot
First you should indicate the cross-compiler to U-Boot:
$export CROSS_COMPILE=<path_to_cross-compiler/cross-compiler-prefix->
<path_to_cross-compiler> is only needed if it is not in your PATH.
Usually
cross-compiler-prefix- looks like
arm-linux- ,
arm-elf- or
arm-none-linux-gnueabi- .
And now you can compile U-Boot. If you want to compile it for Serial Flash:
$ make at91sam9n12ek_dataflash_cs0
The result of this operation is a fresh u-boot binary called
u-boot.bin corresponding to the binary ELF file called
u-boot.
-
u-boot.bin is the file you should store on the board.
-
u-boot is the ELF format binary file you may use to debug u-boot through a JTAG link for instance.
Pre-built image
|
|
| 2.6.39 (2.6.39-at91sam9n12-exp.tar.gz) |
| Board |
Description |
Binary |
| at91sam9n12ek |
linux-2.6.39 uImage
configured by at91sam9n12ek_defconfig \ |
uImage-2.6.39-m2-at91sam9n12ek.bin |
|
|
|
Flashing the Linux kernel image
Using SAM-BA
The procedures to flash the kernel image by using SAM-BA:
- Choose the SerialFlash media tab in the SAM-BA GUI.
- Initialize the media choosing the Enable Serialflash action in the Scripts rolling menu and press Execute.
- Specify 0x100000 as the address of Linux kernel image
- Press Browse Button and choose your kernel image.
- Press Send File button.
- Close SAM-BA, remove the USB cable.
Using U-Boot
You can also flash the kernel image with U-Boot. You must have configured your network access in U-Boot as the binary image will be transferred to the target using TFTP protocol.
Type the following commands:
tftp 0x22000000 uImage-2.6.39-m2-at91sam9n12ek.bin
sf probe 0
sf erase 0x100000 0x300000
sf write 0x22000000 0x100000 0x250000
boot
Note that last parameter is the actual size of the binary written. You may adapt it to the size of your kernel image.
Linux4SAM AT91SAM9N12 Experimental Patches
- Support for AT91SAM9N12 SoC
- DMA use on SD/MMC, SSC (I2S) audio, SPI and NAND flash peripherals
- NAND hardware ECC support using PMECC controller
- LCD with one base layer
- Qtouch touch button
- USB Full-Speed and Ethernet (Through EBI interface)
AT91SAM9n12 Linux kernel sources summary table
Check additional information in the dedicated
Linux Kernel page.
Building Linux kernel
Getting source code
The AT91SAM9N12 patch is based on the 2.6.39 Linux kernel version, so the first step is to get it:
$ wget http://www.kernel.org/pub/linux/kernel/v2.6/linux-2.6.39.tar.bz2
$ tar xvjf linux-2.6.39.tar.bz2
$ cd linux-2.6.39
Now you need to apply the Atmel patch series:
Download experimental patch archive:
$ wget ftp://ftp.linux4sam.org/pub/linux/2.6.39-at91/2.6.39-at91sam9n12-exp.tar.gz
Decompress archive with:
$ tar xvzf 2.6.39-at91sam9n12-exp.tar.gz
And then apply patchset one patch after the other in proper order:
$ patch -p1 < 2.6.39-at91-exp.patch
Configuring and building the kernel
Firstly, use the 9n12ek default kernel configuration:
$ make ARCH=arm at91sam9n12ek_defconfig
Then you can customize the kernel configuration further with:
$ make ARCH=arm menuconfig
Build the Linux kernel image:
$ make ARCH=arm CROSS_COMPILE=<path_to_cross-compiler/cross-compiler-prefix->
<path_to_cross-compiler> is only needed if it is not in your PATH.
Usually
cross-compiler-prefix- looks like
arm-linux- ,
arm-elf- or
arm-none-linux-gnueabi- .
To produce a kernel image suitable for U-Boot:
mkimage -A arm -O linux -C none -T kernel -a 20008000 -e 20008000 -n linux-2.6 -d arch/arm/boot/zImage uImage.bin
Open source embedded distribution solutions
OpenEmbedded 2011.03 QT Demo Binaries
Connect to the
Flashing the root file system page to know how to deploy this UBI/UBIFS image on NAND flash.
Dedicated page that explains
how to build QT Demo for AT91SAM9N12-EK. It explains the procedure to get an QT Demo UBI/UBIFS image. QT Demo is based on the
OpenEmbedded build system.
Buildroot 2011.05 binaries
The Root filesystem image is for all AT91SAM9N12-EK board. It's provided as a UBI image for NAND FLASH memory with
page size of 2KBytes.
Connect to the
Flashing the root file system page to know how to deploy this UBI/UBIFS image on NAND flash.
Dedicated page that explains
how to build BuildRoot for AT91SAM9N12-EK. It explains the procedure to build a BuildRoot UBI/UBIFS image.
FAQ
FAQ about AT91SAM9N12-EK