Flashing a demo for SAMA5D4 Xplained
Evaluation Kit
|
Access the console on DBGU serial port
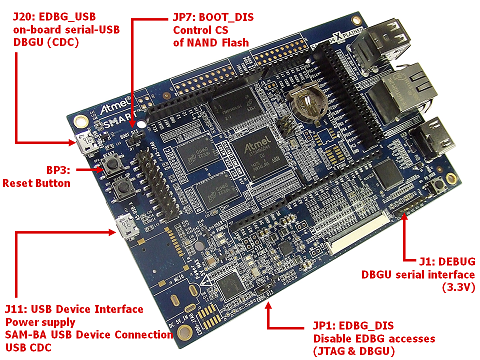
The DBGU serial console can be accessed from two connectors. One is from the DBGU port with the help of a TTL-to-USB serial cable (marked as DEBUG J1), another is from micro-A USB connector that gives access to the on-board serial-to-USB converter (marked as J20 EDBG-USB).Using DBGU on TTL-to-USB connector (DEBUG J1)
- For Microsoft Windows users: Install the driver of your USB TTL serial cable. FTDI-based ones are the most popular, have a look to this page to get the driver: http://www.ftdichip.com/Drivers/VCP.htm

- Be sure to connect a 3.3V compatible cable and identify its GND pin. Place it properly according to the silkscreen and connect the cable to the board (J1)
- For Microsoft Windows users: Identify the USB connection that is established,
USB Serial Portshould appear in Device Manager. TheCOMxxnumber will be used to configure the terminal emulator.

- For Linux users: Identify the serial USB connection by monitoring the last lines of
dmesgcommand. The/dev/ttyUSBxnumber will be used to configure the terminal emulator.
[605576.562740] usb 1-1.1.2: new full-speed USB device number 17 using ehci-pci
[605576.660920] usb 1-1.1.2: New USB device found, idVendor=0403, idProduct=6001
[605576.660933] usb 1-1.1.2: New USB device strings: Mfr=1, Product=2, SerialNumber=3
[605576.660939] usb 1-1.1.2: Product: TTL232R-3V3
[605576.660944] usb 1-1.1.2: Manufacturer: FTDI
[605576.660958] usb 1-1.1.2: SerialNumber: FTGNVZ04
[605576.663092] ftdi_sio 1-1.1.2:1.0: FTDI USB Serial Device converter detected
[605576.663120] usb 1-1.1.2: Detected FT232RL
[605576.663122] usb 1-1.1.2: Number of endpoints 2
[605576.663124] usb 1-1.1.2: Endpoint 1 MaxPacketSize 64
[605576.663126] usb 1-1.1.2: Endpoint 2 MaxPacketSize 64
[605576.663128] usb 1-1.1.2: Setting MaxPacketSize 64
[605576.663483] usb 1-1.1.2: FTDI USB Serial Device converter now attached to ttyUSB0
A /dev/ttyUSB0 node has been created.
- Now open your favorite terminal emulator with appropriate settings
- sama5d2 revision A, only to access the ROMCode through serial interface and see the
RomBOOTmessage appearing, configure your serial line to 57600.
Change it back to 115200 for normal operation.
All components and demo binaries are now configured to work at115200 8-N-1.
115200 8-N-1 :
|
|||||||||||
Using the mirco-A USB connector (J20 EDBG-USB)
You can also access the serial console through the on-board serial-to-USB converter. In fact, the Atmel EDBG (Embedded Debugger) chip on the Evaluation Kit acts as a serial-to-USB converter and is loaded with a firmware that is able to talk USB-CDC protocol.- For Microsoft Windows users: Install USB drivers for Atmel and Segger tools. No need to install a driver on any regular Linux distribution.
- Open JP1 to enable EDBG
- Connect the USB cable to the board (J20 EDBG-USB)
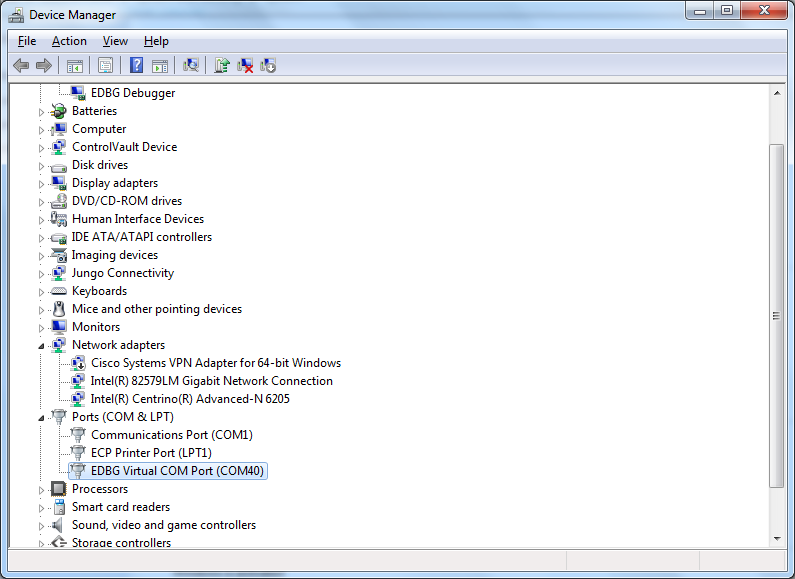
- For Microsoft Windows users: identify the USB connection that is established
EDBG Virtual COM Portshould appear in Device Manager. TheCOMxxnumber will be used to configure the terminal emulator.
- For Linux users: identify the USB connection by monitoring the last lines of
dmesgcommand. The/dev/ttyACMxnumber will be used to configure the terminal emulator.
[  766.492942] usb 2-1.1: new high speed USB device using ehci_hcd and address 8
[  766.585934] cdc_acm 2-1.1:1.0: This device cannot do calls on its own. It is not a modem.
[  766.586033] cdc_acm 2-1.1:1.0: ttyACM0: USB ACM device
It is the CDC driver which is used and you can see that a /dev/ttyACM0 node has been created.
- Now open your favorite terminal emulator with appropriate settings
- sama5d2 revision A, only to access the ROMCode through serial interface and see the
RomBOOTmessage appearing, configure your serial line to 57600.
Change it back to 115200 for normal operation.
All components and demo binaries are now configured to work at115200 8-N-1.
115200 8-N-1 :
|
|||||||||||
Flashing the demo
Before flashing the demo, make sure that you have installed the SAM-BA tool on your host computer.- Short the JP7 (BOOT_DIS) to prevents booting from Nand or serial Flash by disabling Flash Chip Selects
- Connect a USB micro-A cable to the board (J11 5V-USB-A) and powered the board.
- Open the JP7 (BOOT_DIS) to enable booting from Nand or serial Flash by enabling Flash Chip Selects
- For Microsoft Windows users: verify that the USB connection is well established
AT91 USB to Serial Convertershould appear in Device Manager

- For Linux users: check /dev/ttyACMx by monitoring the last lines of
dmesgcommand:
[  766.492942] usb 2-1.1: new high speed USB device using ehci_hcd and address 8
[  766.585934] cdc_acm 2-1.1:1.0: This device cannot do calls on its own. It is not a modem.
[  766.586033] cdc_acm 2-1.1:1.0: ttyACM0: USB ACM device
It is the CDC driver which is used and you can see that a /dev/ttyACM0 node has been created.
- For Microsoft Windows users: Launch the
.batfile corresponding to the board that you are using
This script will run SAM-BA with proper parameters. - For Linux users: if the /dev/ttyACMx that appears is different from /dev/ttyACM0, edit the
.shfile and modify /dev/ttyACMx device number - For Linux users: Launch the
.shfile corresponding to the board that you are using.
This script will runs SAM-BA with proper parameters - When the logfile.log appears (this will take a few minutes), check that
=Done.=is written at the end of the file. - Remove the USB cable.
- Connect a serial link on DBGU and open the terminal emulator program as explained just above
- Power cycle the board.
- Look the system booting through the serial line configured above
Playing with the demo
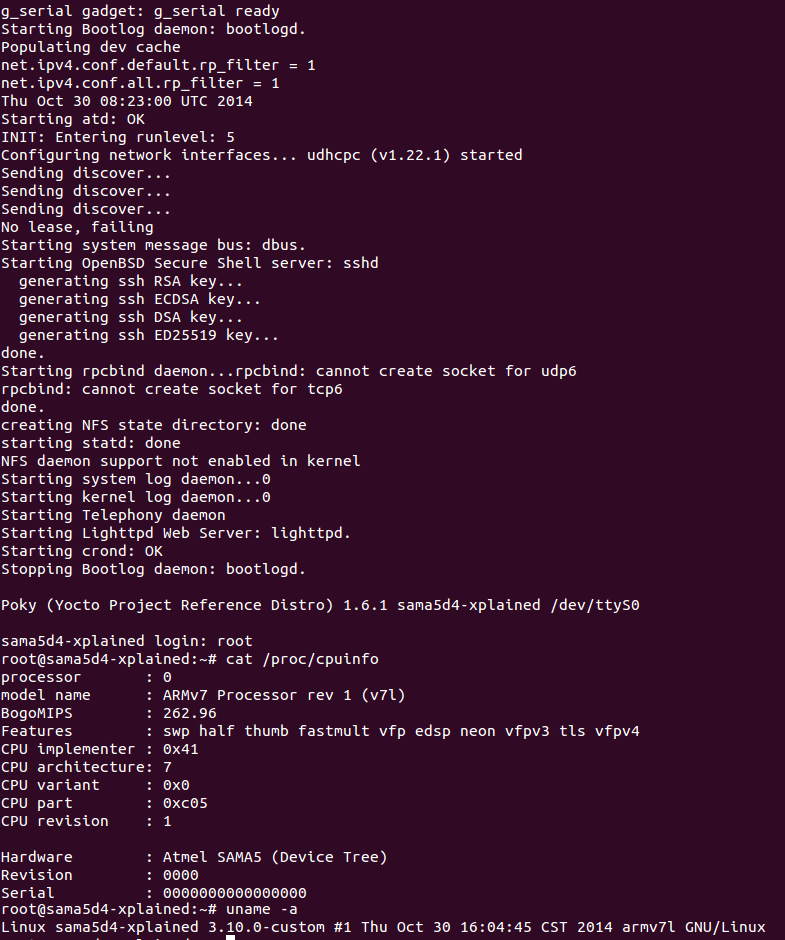
Now you should have the Linux demo up'n running on your board !You can access the Linux console through the serial line as explained just above
Use the
root login account without password.
You can have a look at the boot log as a file for the record or have an overview in the image below:
|
Going forward
If you want to rebuild this demo from sources, go through each component topic and you will have a comprehensive explanation of its role and how to build it.

|
|||||||||||||||||||||||||||||
r1 - 10 Nov 2014 - 16:49:11 - NicolasFerre
Linux4SAM
Open source solutions ApplicationsBoards
- SAMA7D65 Curiosity
- SAM9X75 Curiosity
- SAMA5D29 Curiosity
- SAM9X60 Curiosity
- SAMA7G5-EK
- SAMA5D2-ICP
- SAMA5D27 WLSOM1 EK
- SAM9X60-EK
- SAMA5D27 SOM1 EK
- SAMA5D2 PTC EK
- SAMA5D2 Xplained
- SAMA5D3 Xplained
- SAMA5D4 Xplained
- Older boards
FAQ
Useful links
- Microchip Microprocessors forums
- AT91 Community (archive)
- Microchip
- Linux4Microchip on GitHub
- Linux4SAM on GitHub
NAVIGATION
Copyright © by the contributing authors. All material on this collaboration platform is the property of the contributing authors.
Linux® is the registered trademark of Linus Torvalds in the U.S. and other countries.
Microchip and others, are registered trademarks or trademarks of Microchip Technology Inc. and its subsidiaries. ![]()
Arm® and others are registered trademarks or trademarks of Arm Limited (or its affiliates). Other terms and product names may be trademarks of others.
Ideas, requests, contributions ? Connect to LinksToCommunities page.