Boot Logo for SAM SOC's
Introduction
Using a splash screen or a boot logo is a good idea to display something on the LCD screen to the user till Linux boots completely and displays the graphical application. This page describes how to display a boot logo using U-boot and Linux.Displaying boot logo in U-Boot
The following steps will allow you to display a logo/splash screen. 1. Modify the Device Tree Depending on the LCD panel model being used the display timings need to modified for the hlcdc device node in the u-boot-at91/arch/arm/dts/<board-name>.dts file. A list of some popular evaluation boards and their dts files are given below:- SAMA5D2 Xplained: u-boot-at91/arch/arm/dts/at91-sama5d2_xplained.dts
- ATSAMA5D27-SOM1-EK1: u-boot-at91/arch/arm/dts/ at91-sama5d27_som1_ek.dts
- ATSAMA5D27-WLSOM1 Evaluation Kit: u-boot-at91/arch/arm/dts/ at91-sama5d27_wlsom1_ek.dts
                         hlcdc: hlcdc@f0000000 {
                               atmel,vl-bpix = <4>;
                               atmel,guard-time = <1>;
                               pinctrl-names = "default";
                               pinctrl-0 = <&pinctrl_lcd_base &pinctrl_lcd_pwm &pinctrl_lcd_rgb>;
                               status = "okay";
                               u-boot,dm-pre-reloc;

                              display-timings {
                                    u-boot,dm-pre-reloc;
                                    800x480 {
                                            clock-frequency = <9000000>;
                                             hactive = <800>;
                                             vactive = <480>;
                                             hsync-len = <48>;
                                             hfront-porch = <40>;
                                             hback-porch = <40>;
                                             vfront-porch = <13>;
                                             vback-porch = <29>;
                                             vsync-len = <11>;
                                             u-boot,dm-pre-reloc;
                                    };
                              };
                         };
For the 4.3 inch 480 x 272 TFT display
                         hlcdc: hlcdc@f0000000 {
                               atmel,vl-bpix = <4>;
                               atmel,guard-time = <1>;
                               pinctrl-names = "default";
                               pinctrl-0 = <&pinctrl_lcd_base &pinctrl_lcd_pwm &pinctrl_lcd_rgb>;
                               status = "okay";
                               u-boot,dm-pre-reloc;

                              display-timings {
                                    u-boot,dm-pre-reloc;
                                    480x272 {
						clock-frequency = <9000000>;
						hactive = <480>;
						vactive = <272>;
						hsync-len = <41>;
						hfront-porch = <2>;
						hback-porch = <2>;
						vfront-porch = <2>;
						vback-porch = <2>;
						vsync-len = <11>;
						u-boot,dm-pre-reloc;
};
                              };
                         };
Note: The above DT is for the SAMA5D2 Xplained board.
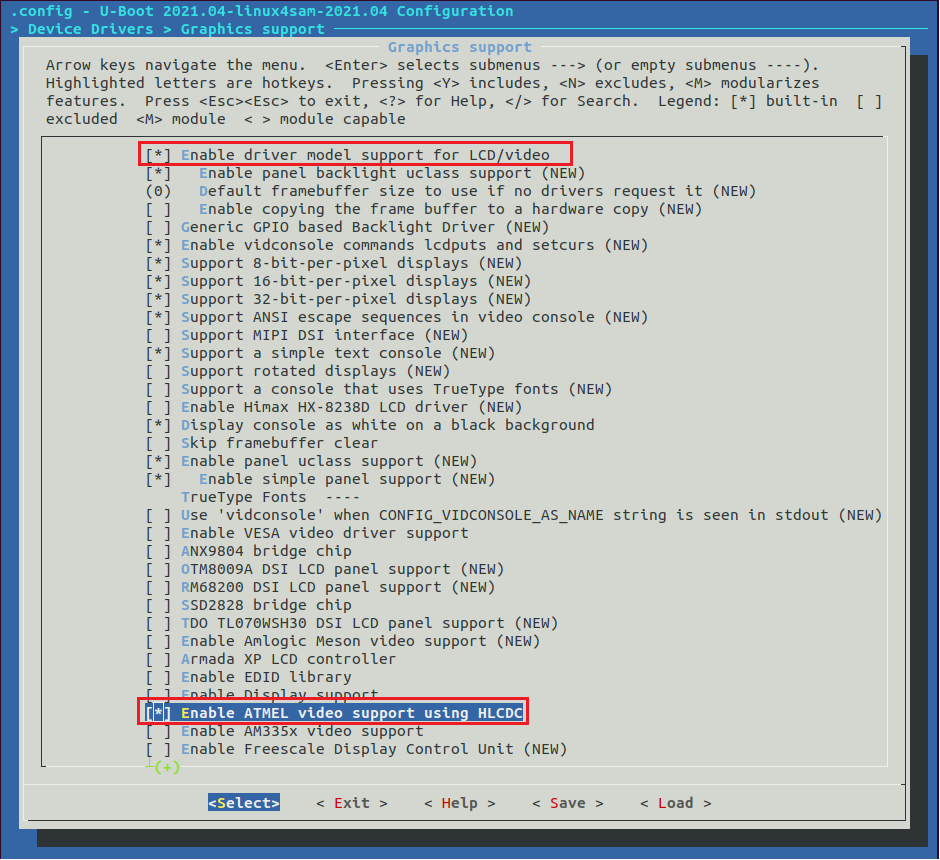
2. Modify the U-Boot configuration using menuconfig
Change directory to the u-boot-at91 folder and type make ARCH=arm menuconfig. Select
"Device Drivers" ---> "Graphics support". Press the spacebar to select Enable driver model support for LCD/video. Come down the list and select Enable ATMEL video support using HLCDC.
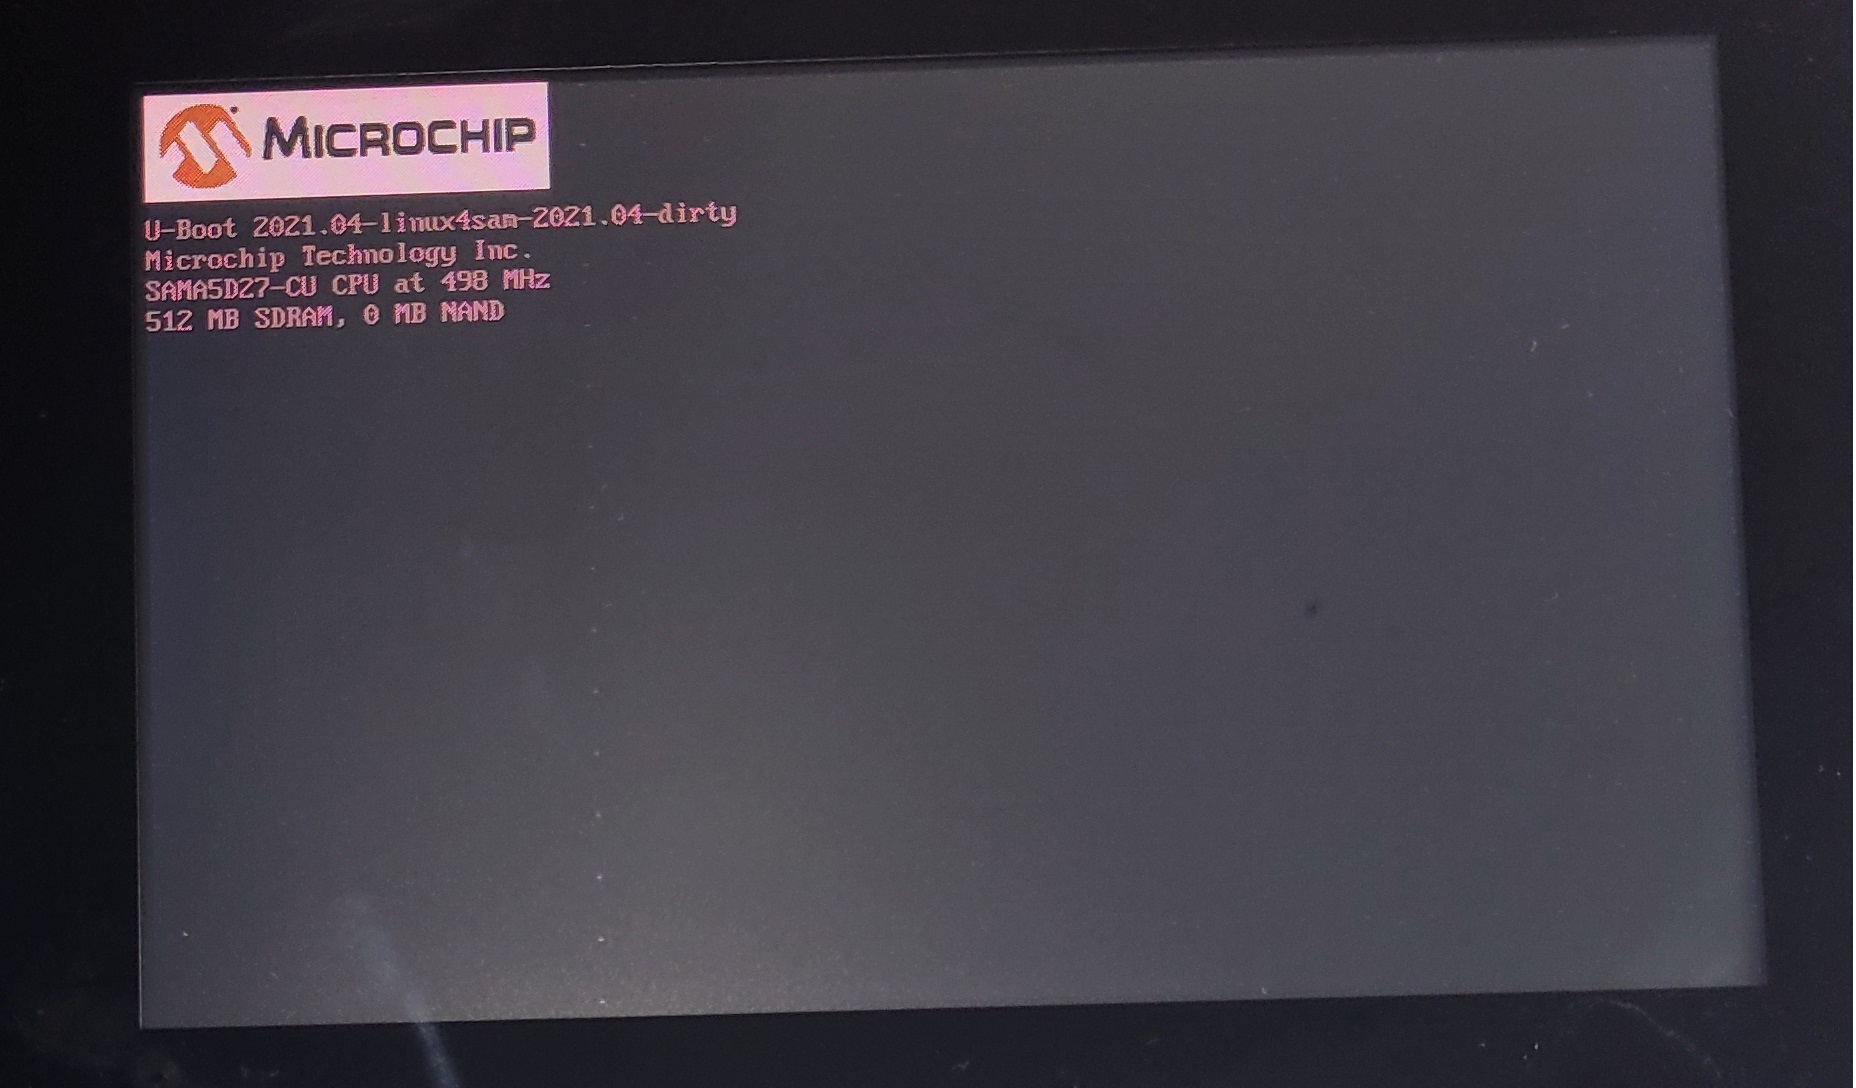
 Save the configuration and rebuild U-Boot by typing make ARCH=arm. When you boot with the resulting u-boot.bin, you can see the Microchip Logo and some information about the target board as shown below.
 3. Displaying a custom splash screen
If you want to display a custom image for splash screen, there are two ways to do this:
a. Including the image directly in the header file
b. Using the U-Boot BMP command
Both methods are described below.
a. Including the image directly in the header file
- The microchip logo is defined in u-boot-at91/lib/at91/microchip_logo_8bpp.h. You can either include your image to the microchip_logo_8bpp.h or create a new header file custom_logo.h in u-boot-at91/lib/at91/ and add the header file to u-boot-at91/lib/at91/at91.c. Also add a function custom_logo_info() to u-boot-at91/lib/at91/at91.c:
3. Displaying a custom splash screen
If you want to display a custom image for splash screen, there are two ways to do this:
a. Including the image directly in the header file
b. Using the U-Boot BMP command
Both methods are described below.
a. Including the image directly in the header file
- The microchip logo is defined in u-boot-at91/lib/at91/microchip_logo_8bpp.h. You can either include your image to the microchip_logo_8bpp.h or create a new header file custom_logo.h in u-boot-at91/lib/at91/ and add the header file to u-boot-at91/lib/at91/at91.c. Also add a function custom_logo_info() to u-boot-at91/lib/at91/at91.c:
#include "atmel_logo_8bpp.h"
#include "microchip_logo_8bpp.h"
*#include custom_logo.h*
[..]
void custom_logo_info(vidinfo_t *info)
{
info->logo_width = CUSTOM_LOGO_8BPP_WIDTH;
info->logo_height = CUSTOM_LOGO_8BPP_HEIGHT;
info->logo_x_offset = CUSTOM_LOGO_8BPP_X_OFFSET;
info->logo_y_offset = CUSTOM_LOGO_8BPP_Y_OFFSET;
info->logo_addr = (u_long)custom_logo_8bpp;
}
- To create an unsigned char array for the custom image, use the hexdump command as follows:
hexdump -v -e '15/1 "0x%02X, " 1/1 " 0x%02X, \n" ' custom_image.bmp > bmp.txt
NOTE: You can only use 8bpp BMP custom image. If you are using an image in any other format, you can convert it to 8 bpp BMP image using the Total Image Converter tool.
- In u-boot-at91/lib/at91/custom_logo.h, define CUSTOM_LOGO_8BPP_WIDTH, CUSTOM_LOGO_8BPP_HEIGHT, CUSTOM_LOGO_8BPP_X_OFFSET, CUSTOM_LOGO_8BPP_Y_OFFSET and unsigned char array custom_logo_8bpp, as done in microchip_logo_8bpp.h. Copy the ouput of the hexdump command in bmp.txt to define custom_logo_8bpp.
- Define the custom_logo_info() function in include/atmel_lcd.h header file.
- Finally in board/atmel/common/video_display.c, in function at91_video_show_board_info(), replace microchip_logo_info(&logo_info) with custom_logo_info(&logo_info).
- Now rebuild U-Boot image and use the resulting image to boot on target board.
You can see your custom splash screen being displayed.
NOTE: If you dont want to display the target board information, comment out the following lines from the function at91_video_show_board_info() in board/atmel/common/video_display.c:
/*ret = uclass_get_device(UCLASS_VIDEO_CONSOLE, 0, &con);
	if (ret)
		return ret;
	priv = dev_get_uclass_priv(con);
	vidconsole_position_cursor(con, 0, (logo_info.logo_height +
				   priv->y_charsize - 1) / priv->y_charsize);
	for (s = buf, i = 0; i < len; s++, i++)
		vidconsole_put_char(con, *s);*/
b. Using the U-Boot BMP command - Change directory to the u-boot-at91 folder and type make ARCH=arm menuconfig. Select "Command line interface" ---> "Misc commands" and press spacebar to select Enable bmp command. Save changes and rebuild U-Boot and boot with the resulting u-boot.img. - Assuming we are booting from SD card, copy the custom_splash.bmp in the boot partition. If you are booting from a different NVM, program the image at a suitable memory location and in the next step copy the image from this memory location to the memory @0x22000000. - Hit Enter to break at the U-Boot command prompt and type the following commands:
=> fatls mmc 1:1   --> command lists the files in the boot partition
    23929   BOOT.BIN
  4989756   sama5d2_xplained.itb
   548419   u-boot.bin
    16384   uboot.env
   165578   custom_splash.bmp

5 file(s), 0 dir(s)

=> fatload mmc 1:1 0x22000000 custom_splash.bmp  --> command copies custom_splash.bmp to memory @ 0x22000000
165578 bytes read in 23 ms (6.9 !MiB/s)

=> bmp info 0x22000000  --> command displays information about the bmp. Confirm it is 8bpp
Image size    : 500 x 329
Bits per pixel: 8
Compression   : 0

=> bmp display 0x22000000 --> command displays bmp @ 0x220000
Note that in the above commands, the SD card is in mmc1 interface (as it is in the case of sama5d2 Xplained).
- Instead of manually entering these commands, you can automatically display the splash screen by adding the command to bootcmd. Type the following commands at U-Boot command prompt:
=> edit bootcmd
edit: run bootlogo; run at91_set_display; run at91_pda_detect; [..]
=> setenv bootlogo 'fatload mmc 1:1 0x22000000 custom_splash.bmp ; \
bmp display 0x22000000; bootdelay 50'
=> saveenv
Saving Environment to FAT... OK
Reset the target to see the splash screen being displayed. NOTE: You may want to comment out the at91_video_show_board_info() function call in the boad_late_init() in board/atmel/
=> bdinfo
[..]
Video       = hlcdc@f0000000 active
FB base     = 0x3fe00000
FB size     = 800x480x16
[..]
From the above, we can see that the framebuffer is allocated @ 0x3fe00000 for a size of less than 1MB. 2. Using debug() In older versions of U-Boot, the bdinfo command is not supported. You can find the memory reserved using the debug() message in the video_reserve() function in u-boot-at91/drivers/video/video-uclass.c. To do this, add the following lines at the very top of video-uclass.c before any #include:
#define DEBUG
#undef CONFIG_LOGLEVEL
#define CONFIG_LOGLEVEL 8
Also add the following compiler flag to u-boot-at91/drivers/video/Makefile:
ifdef CONFIG_DM
[..]
CFLAGS_video-uclass.o+= -DDEBUG -DCONFIG_LOGLEVEL=8
endif
Rebuild U-Boot and boot with the resulting u-boot.img. You will find the memory location reserved for framebuffer reported in the U-Boot boot log:
U-Boot 2021.04-linux4sam-2021.04-dirty (May 05 2022 - 14:14:57 -0700)

CPU: SAMA5D27-CU
Crystal frequency:       12 MHz
CPU clock        :      498 MHz
Master clock     :      166 MHz
DRAM:  video_reserve: Reserving 1f0000 bytes at 3fe00000 for video device 'hlcdc@f0000000'
Video frame buffers from 3fe00000 to 3fff0000
512 MiB
video_post_bind: Claiming 1f0000 bytes at 3fe00000 for video device 'hlcdc@f0000000'
MMC:   sdio-host@a0000000: 0, sdio-host@b0000000: 1
In the next section we will see how to reserve the framebuffer memory used by U-Boot so that the kernel doesnt over-write it.
Reserving framebuffer memory in Linux
To reserve the framebuffer memory used by U-Boot, follow the instructions below: 1. In the linux default .config file, make sure that OF_RESERVED_MEM is set to true. 2. In the parent device tree header file, for example sama5d2.dtsi (in the case of sama5d2 xplained), add the following in the root of the device tree. A good place to define this would be after the ns_ram definition:
ns_sram: sram@200000 {
		compatible = "mmio-sram";
		reg = <0x00200000 0x20000>;
	};

reserved-memory {
                 #address-cells = <1>;
                 #size-cells = <1>;
                 ranges;

                 display_reserved: framebuffer@3FE00000 {
                                  reg = <0x3FE00000 0x100000>;
                 };
 };
ahb{
	[..]
Next, under hlcd device node set the memory-region property as show in below:
                     hlcdc: hlcdc@f0000000 {
                             compatible = "atmel,sama5d4-hlcdc";
                             reg = <0xf0000000 0x4000>;
                             interrupts = <51 IRQ_TYPE_LEVEL_HIGH 0>;
                             clocks = <&lcdc_clk>, <&lcdck>, <&clk32k>;
                             clock-names = "periph_clk","sys_clk", "slow_clk";
                             status = "disabled";

                             memory-region = <&display_reserved>;   <-- Add this
                     }
3. Now rebuild the kernel and DT-overlay. Replace the resulting kernel (DTB image) in your target and reboot.
Now while Linux is booting you will see that the splash screen displayed by U-Boot will be preserved till the DRM device gets configured by userspace application or /dev/fb0 emulation is created.
If you are in doubt whether the memory got reserved, in __reserved_mem_reserve_reg() in linux-at91/drivers/of/fdt.c, replace:
pr_debug("Reserved memory: reserved region for node '%s': base %pa, size %ld MiB\n",
uname, &base, (unsigned long)size / SZ_1M);
with
printk("Reserved memory: reserved region for node '%s': base %pa, size %ld MiB\n",
uname, &base, (unsigned long)size / SZ_1M);
You should see the framebuffer memory reserved being reported in the kernel log:
Starting kernel ...

Booting Linux on physical CPU 0x0
Linux version 5.10.80-linux4microchip-2021.10-dirty (swapna@swapna-Latitude-E7440) (arm-poky-linux-gnueabi-gcc (GCC) 7.3.0, GNU ld (GNU Binutils) 2.30.0.20180208) #56 Thu May 5 15:03:41 PDT 2022
CPU: ARMv7 Processor [410fc051] revision 1 (ARMv7), cr=10c53c7d
CPU: PIPT / VIPT nonaliasing data cache, VIPT aliasing instruction cache
OF: fdt: Machine model: Atmel SAMA5D2 Xplained TM5000
Memory policy: Data cache writeback
Reserved memory: reserved region for node 'framebuffer@3FE00000': base 0x3fe00000, size 2 MiB   <-----
cma: Reserved 16 MiB at 0x3e800000
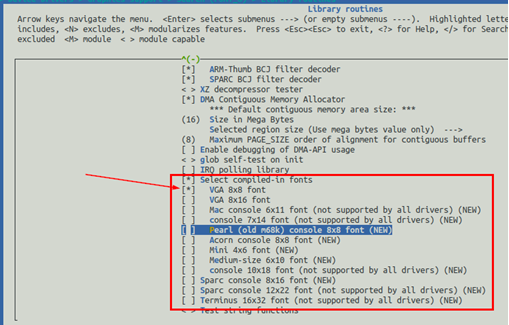
Displaying Kernel Logo
As mentioned earlier the splash screen displayed by U-Boot is maintained by the kernel only till DRM device gets configured by userspace application. After that the screen turns black till the final graphical application is displayed. This could take more than a second. Therefore, it could be a good idea to display a second logo by the linux kernel. To do this, follow the instructions below. 1. Change to linux-at91 directory and type make ARCH=arm menuconfig. Select "Device Drivers" --> "Graphics Support". In Frame buffer Device make sure Support for frame buffer devices is selected. In Console display driver support make sure Framebuffer Console support is selected. Select Bootup logo and make sure Standard 224-color Linux logo is selected.Displaying custom kernel logo
Instead of displaying the Linux Logo, if you want to display a custom logo, here is a quick and easy way to do that: 1. Open your custom image in gimp (Install gimp if you dont already have it installed). From main menu, select File-> Export As. Expand File Type (By Extension)” and select PPM Image and select Export. 2. On your Linux PC install netpbm and type the following commands:$ ppmquant 224 custom_logo1.ppm > custom_logo1_224.ppm ppmquant: making histogram... ppmquant: 253 colors found ppmquant: choosing 224 colors... ppmquant: mapping image to new colors... $ pnmnoraw custom_logo1_224.ppm > logo_linux_clut224.ppm $ mv ~/linux-at91/drivers/video/logo/logo_linux_clut224.ppm ~/linux-at91/drivers/video/logo/logo_linux_clut224.ppmOrig $ cp logo_linux_clut224.ppm ~/linux-at91/drivers/video/logo/logo_linux_clut224.ppm3. Rebuild linux kernel and DTB and boot with the new kernel image. You will now see the Linux kernel display the custom logo till the final graphics application is displayed.
| WebFaqBaseForm | |
|---|---|
| Boards | Sama5d2Xplained |
| Components | linux-5.15-mchp, linux-6.1-mchp |
| Summary | Boot Logo for At91 SOC's |


|
||||||||||||||||||||||||||||||||||||
r18 - 25 Aug 2023 - 09:02:03 - NicolasFerre
Linux4SAM
Open source solutions ApplicationsBoards
- SAM9X75 Curiosity
- SAMA5D29 Curiosity
- SAM9X60 Curiosity
- SAMA7G5-EK
- SAMA5D2-ICP
- SAMA5D27 WLSOM1 EK
- SAM9X60-EK
- SAMA5D27 SOM1 EK
- SAMA5D2 PTC EK
- SAMA5D2 Xplained
- SAMA5D3 Xplained
- SAMA5D4 Xplained
- Older boards
FAQ
Useful links
- Microchip Microprocessors forums
- AT91 Community (archive)
- Microchip
- Linux4Microchip on GitHub
- Linux4SAM on GitHub
NAVIGATION
Copyright © by the contributing authors. All material on this collaboration platform is the property of the contributing authors.
Linux® is the registered trademark of Linus Torvalds in the U.S. and other countries.
Microchip® and others, are registered trademarks or trademarks of Microchip Technology Inc. and its subsidiaries. ![]()
Arm® and others are registered trademarks or trademarks of Arm Limited (or its affiliates). Other terms and product names may be trademarks of others.
Ideas, requests, contributions ? Connect to LinksToCommunities page.