Legacy Getting Started page for AT91SAM9x5 family
This page is a starting point for the Linux4SAM offer and allows you to easily get a running embedded Linux distribution on SAM9x5 products. Each product: SAM9G15, SAM9G25, SAM9G35, SAM9X25 and SAM9X35 is supported at the same level with same components. On the software side, the nature of the chip and board is determined at runtime.
This Getting started describes also how a Linux4SAM system boots and how binaries are installed on FLASH memories. For each topic a more detailed section exists with in-depth description, valuables web links, source code how to rebuild used binaries.
 Click on the image up above to select a topic.
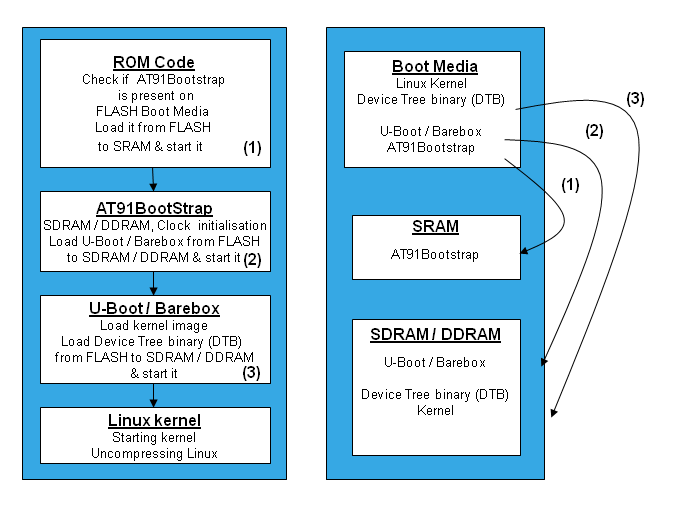
Several pieces of software are involved to boot a linux kernel on SAM9 products. First is the ROM code which is in charge to check if a valid application is present on supported media (FLASH, DATAFLASH, NANDFLASH, SDCARD).
The boot sequence of linux4SAM is done in several steps :
- Boot Program - Check if a valid application is present in FLASH and if it is the case download it into internal SRAM.
For more information on this topic, please check following diagram extracted from the product datasheet and the Boot capabilities matrix.

- AT91Bootstrap - In charge of hardware configuration, download U-Boot binary frome FLASH to SDRAM, start the bootloader
- U-Boot - The bootloader, in charge of download kernel binaries from FLASH, network, USB key, etc. Start the kernel.
- Linux kernel - The operating system kernel.
- Root Filesystem - Contains applications which are executed on the target, using the OS kernel services.
- Processor comes out of reset and branches to the ROM startup code.
- The ROM startup code initializes the CPU and memory controller, performing only minimal initialization of on-chip devices, such as the console serial port to provide boot diagnostic messages. It also sets up the memory map for the kernel to use in a format that is consistent across platforms, and then jumps to the boot loader.
- The boot loader decompresses the kernel into RAM, and jumps to it.
- The kernel sets up the caches, initializes each of the hardware devices via the init function in each driver, mounts the root filesystem and execs the init process, which is the ultimate parent of all user mode processes, typically /sbin/initd.
- Executing the first program linked against the shared C runtime library (often init) causes the shared runtime library to be loaded. In a typical Linux system, init reads /etc/inittab to execute the appropriate run control script from /etc/rc.d, which execute the start scripts to initialize networking and other system services

Hardware
- a Windows XP host (or later) or a Linux distribution to run the SAM-BA tool ;
- power supply stocked with the Evaluation Kit ;
- USB Device Cable ;
- serial Cross Cable (Female-Female) ;
- AT91SAM9-EK Evaluation Kit. Check below how kits look like and how to connect them :
|
|
| AT91SAM9X5-EK |
 |
|
|
|
Software
- a serial terminal emulator (HyperTerminal, minicom, Tera Term, etc.) :
Exceptions:
- sama5d2 revision A, only to access the ROMCode through serial interface and see the
RomBOOT message appearing, configure your serial line to 57600.
Change it back to 115200 for normal operation.
All components and demo binaries are now configured to work at 115200 8-N-1.
The usual serial communication parameters are
115200 8-N-1 :
|
|
| Baud rate |
115200 |
| Data |
8 bits |
| Parity |
None |
| Stop |
1 bit |
| Flow control |
None |
|
|
|
- SAM-BA 2.10
 + AT91SAM9x5 dedicated patch (or later version that integrates it)
- the demo archive provide just below. This archive contains :
- all 4 components binaries : AT91Bootstrap, u-boot, Linux kernel, root filesystem ;
- a TCL/SAM-BA script that interfaces with the SAM-BA tool to flash the demo ;
- a .bat script able to run the flashing script calling SAM-BA itself.
Before flashing the demo, make sure that you have installed the
SAM-BA tool on your host computer.
- connect a USB cable on the board
- connect a serial link on DBGU connector and open the terminal emulator program
|
|
| !AT91SAM9X5-EK |
- JP9 must be opened (BMS=1) to boot from the on-chip Boot ROM
| Cogent module | Embest module | Ronetix module | open *NCS jumper | open SW1 switch (not ON position) | open J1 and J2 jumpers | | which is (are) located on the CPU module to prevent access to serial flash and NAND flash | - power up the board
- verify that the USB connection is established (ATMEL AT91xxxxx Test Board appears in taskbar notification area, or check
/dev/ttyACM0 on Linux) | Cogent module | Embest module | Ronetix module | close *NCS jumper | close SW1 switch (move to ON position) | close J1 and J2 jumpers | - launch the proper
.bat file : this script will run SAM-BA with proper parameters ; on a Linux host, run the .tcl script form the SAM-BA GUI - when the
logfile.log appears (this will take a few minutes), check that Done. is written a the end of the file - remove the USB cable
- power cycle the board
- look the system booting on the LCD screen or trough the serial line
|
|
|
|
Ok, now you should have the Linux demo up'n running on your board !
Have a walk through applications of this demo.
You can also access the Linux console through the serial line plugged on DBGU port.
Use the
root login account without password.
If you want to rebuild this demo from sources, go
through each component topic and you will have a comprehensive explanation of it role and how to build it.
Notes
:


