SAMA5D3XEK
SoC Features
Operating at 850DMIPS at under 150mW, the SAMA5D3 MPU is ideal for any high-performance, low-power and cost-sensitive industrial application. Think of it for control panels, smart grid devices and bar code scannersanything that needs high levels of connectivity, enhanced user interfaces, robust security or is battery powered. The SAMA5D3 is also an ideal fit for wearable computing and mobile applications where low power and a small footprint are critical. The SAMA5D3 series includes devices supporting a -40/+105°C temperature range as well as 12x12mm BGA324 package (in 0.5mm pitch).
Kit Information
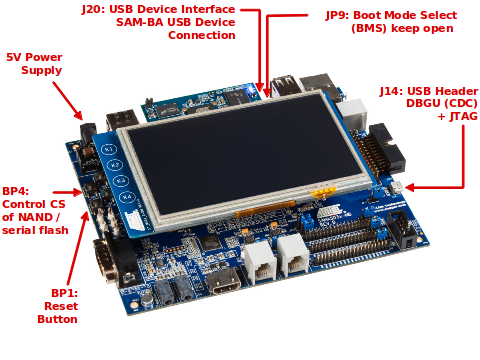
Kit Overview
Access the console
The usual serial communication parameters are115200 8-N-1 :
|
|||||||||||
Access the console on DBGU serial port
You can access the serial console through the on-board serial-USB converter. In fact, the Cortex-M3 chip underneath the Evaluation Kit acts as a serial-to-USB converter and is loaded with a firmware that is able to speak USB-CDC.- For Microsoft Windows users: Install the J-Link CDC USB driver
 . No need to install a driver on any regular Linux distribution.
- Connect the USB cable to the board (J14 – JTAG and USB Serial DBGU)
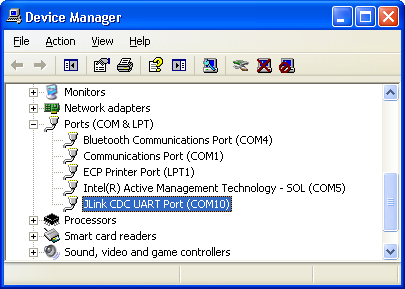
- For Microsoft Windows users: identify the USB connection that is established
JLink CDC UART Portshould appear in Device Manager. TheCOMxxnumber will be used to configure the terminal emulator.
- For Microsoft Windows users: identify the USB connection that is established
-
- For Linux users: identify the USB connection by monitoring the last lines of
dmesgcommand. The/dev/ttyACMxnumber will be used to configure the terminal emulator.
- For Linux users: identify the USB connection by monitoring the last lines of
- Now open your favorite terminal emulator with appropriate settings
Demo
Demo archives
|
|||||||||
Build From source code
Setup ARM Cross Compiler
- Ubuntu:
In Ubuntu 22.04 LTS, you can install the ARM Cross Compiler by doing:sudo apt-get install gcc-arm-linux-gnueabi export CROSS_COMPILE=arm-linux-gnueabi-
- Others:
For others, you can download the ARM cross compiler and setup the environment by doing:wget -c https://developer.arm.com/-/media/Files/downloads/gnu/11.2-2022.02/binrel/gcc-arm-11.2-2022.02-x86_64-arm-none-linux-gnueabihf.tar.xz?rev=ffc49e4af4cb4c298c2110a4d887716c&hash=4999788F321A7617C04CA172E31F6B22520741FF export CROSS_COMPILE=`pwd`/gcc-arm-11.2-2022.02-x86_64-arm-none-linux-gnueabihf/bin/arm-none-linux-gnueabihf-
Build AT91Bootstrap from sources
This section describes how to get source code from the git repository, how to configure with the default configuration, how to customize AT91Bootstrap based on the default configuration and finally to build AT91Bootstrap to produce the binary. take the default configuration to download U-Boot from NandFlash for example.Get AT91Bootstrap Source Code
You can easily download AT91Bootstrap source code on the at91bootstrapTo get the source code, you should clone the repository by doing:
$ git clone https://github.com/linux4sam/at91bootstrap.git
Cloning into 'at91bootstrap'...
remote: Enumerating objects: 17621, done.
remote: Counting objects: 100% (3324/3324), done.
remote: Compressing objects: 100% (1029/1029), done.
remote: Total 17621 (delta 2465), reused 3102 (delta 2285), pack-reused 14297
Receiving objects: 100% (17621/17621), 5.65 MiB | 4.65 MiB/s, done.
Resolving deltas: 100% (13459/13459), done.
$ cd at91bootstrap/
Configure AT91Bootstrap
Assuming you are at the AT91Bootstrap root directory, you will find aboard/sama5d3xek folder which contains several default configuration files: sama5d3xekdf_linux_image_dt_defconfig sama5d3xekdf_uboot_defconfig sama5d3xeknf_android_image_dt_defconfig sama5d3xeknf_linux_image_dt_defconfig sama5d3xeknf_uboot_defconfig sama5d3xeksd_android_image_dt_defconfig sama5d3xeksd_linux_image_dt_defconfig sama5d3xeksd_uboot_defconfig
nf means to read nandflash, df means to read serial flash, sd means to read mmc card. linux means to load linux kernel to RAM, android means to load android kernel to RAM, uboot means to load u-boot to RAM, dt means to load dtb to RAM.
You can configure AT91Bootstrap to load U-Boot binary from NAND flash by doing:
$ make mrproper
$ make sama5d3xeknf_uboot_defconfig
If the configuring process is successful, the .config file can be found at AT91Bootstrap root directory.
Customize AT91Bootstrap
If the default configuration doesn't meet your need, after configuring with the default configuration, you can customize it by doing:$ make menuconfigNow, in the menuconfig dialog, you can easily add or remove some features to/from AT91Bootstrap as the same way as kernel configuration.
Move to
<Exit> with arrows and press this button hitting the Enter key to exit from this screen.
Build AT91Bootstrap
Then you can build the AT91Bootstrap binary by doing:$ makeIf the building process is successful, the final .bin image is build/binaries/at91bootstrap.bin.
Build U-Boot from sources
Getting U-Boot sources
Dedicated page on U-Boot wiki: http://www.denx.de/wiki/U-Boot/SourceCode- clone the Linux4sam GitHub U-Boot repository
   $ git clone https://github.com/linux4microchip/u-boot-mchp.git
 Cloning into 'u-boot-mchp'...
 remote: Enumerating objects: 951876, done.
 remote: Counting objects: 100% (17718/17718), done.
 remote: Compressing objects: 100% (5735/5735), done.
 remote: Total 951876 (delta 12391), reused 15314 (delta 11846), pack-reused 934158
 Receiving objects: 100% (951876/951876), 164.77 MiB | 401.00 KiB/s, done.
 Resolving deltas: 100% (790362/790362), done.
   $ cd u-boot-mchp/
- The source code has been taken from the master branch which is pointing to the latest branch we use. If you want to use the other branch, you can list them and use one of them by doing:
   $ git branch -r
  origin/HEAD -> origin/master
  origin/dev/tony/sama7g5ek_optee
  origin/master
  origin/sam9x60_curiosity_early
  origin/sam9x60_early
  origin/sam9x60_iar
  origin/sam9x7_early
  origin/sama5d27wlsom1ek_ear
  origin/sama7g5_early
  origin/u-boot-2012.10-at91
  origin/u-boot-2013.07-at91
  origin/u-boot-2014.07-at91
  origin/u-boot-2015.01-at91
  origin/u-boot-2016.01-at91
  origin/u-boot-2016.03-at91
  origin/u-boot-2017.03-at91
  origin/u-boot-2018.07-at91
  origin/u-boot-2019.04-at91
  origin/u-boot-2020.01-at91
  origin/u-boot-2021.04-at91
  origin/u-boot-2022.01-at91
  origin/u-boot-2023.07-mchp
  origin/uboot_5series_1.x

   $ git checkout origin/u-boot-2023.07-mchp -b u-boot-2023.07-mchp
  Branch 'u-boot-2023.07-mchp' set up to track remote branch 'u-boot-2023.07-mchp' from 'origin'.
  Switched to a new branch 'u-boot-2023.07-mchp'
Cross-compiling U-Boot
Before compiling the U-Boot, you need setup cross compile toolchain in the section.configs/ to find the exact target when invoking make.
The U-Boot environment variables can be stored in different media, above config files can specify where to store the U-Boot environment.
   # To put environment variables in serial flash:
   sama5d3xek_spiflash_defconfig
   # To put environment variables in nandflash (default):
   sama5d3xek_nandflash_defconfig
   # To put environment variables in SD/MMC card:
   sama5d3xek_mmc_defconfig
Here are the building steps for the SAMA5D3x-EK board:
# You can change the config according to your needs.
make sama5d3xek_nandflash_defconfig
make
The result of these operations is a fresh U-Boot binary called
u-boot.bin corresponding to the binary ELF file u-boot. -
u-boot.binis the file you should store on the board -
u-bootis the ELF format binary file you may use to debug U-Boot through a JTag link for instance.
Build Kernel from sources
Required packages
You must install essential host packages on your build host. These requirements are listed in the Linux kernel documentation with the chapter Install build requirements- build-essential
- flex
- bison
- git
- perl-base
- libssl-dev
- libncurses5-dev
- libncursesw5-dev
- ncurses-dev
Getting Kernel sources
To get the source code, you have to clone the repository:$ git clone https://github.com/linux4microchip/linux.git Cloning into 'linux'... remote: Enumerating objects: 8587836, done. remote: Total 8587836 (delta 0), reused 0 (delta 0), pack-reused 8587836 Receiving objects: 100% (8587836/8587836), 3.49 GiB | 13.44 MiB/s, done. Resolving deltas: 100% (7117887/7117887), done. Updating files: 100% (70687/70687), done. $ cd linuxThe source code has been taken from the master branch which is pointing on the latest branch we use.
$ git remote add linux4microchip https://github.com/linux4microchip/linux.git
$ git remote update linux4microchip
Fetching linux4icrochip
From https://github.com/linux4microchip/linux
 * [new branch]                linux-5.10-mchp -> linux4microchip/linux-5.10-mchp
 * [new branch]                linux-5.15-mchp -> linux4microchip/linux-5.15-mchp
 * [new branch]                linux-6.1-mchp -> linux4microchip/linux-6.1-mchp
 * [new branch]                master     -> linux4microchip/master
If you want to use another branch, you can list them and use one of them by doing this:
$ git branch -r
  origin/HEAD -> origin/master
  origin/linux-5.10-mchp
  origin/linux-5.15-mchp
  origin/linux-6.1-mchp
  origin/master
$ git checkout origin/linux-6.1-mchp -b linux-6.1-mchp
Branch linux-6.1-mchp set up to track remote branch linux-6.1-mchp from origin.
Switched to a new branch 'linux-6.1-mchp'
Setup ARM Cross Compiler
- Ubuntu:
In Ubuntu 22.04 LTS, you can install the ARM Cross Compiler by doing:sudo apt-get install gcc-arm-linux-gnueabi export CROSS_COMPILE=arm-linux-gnueabi-
- Others:
For others, you can download the ARM cross compiler and setup the environment by doing:wget -c https://developer.arm.com/-/media/Files/downloads/gnu/11.2-2022.02/binrel/gcc-arm-11.2-2022.02-x86_64-arm-none-linux-gnueabihf.tar.xz?rev=ffc49e4af4cb4c298c2110a4d887716c&hash=4999788F321A7617C04CA172E31F6B22520741FF export CROSS_COMPILE=`pwd`/gcc-arm-11.2-2022.02-x86_64-arm-none-linux-gnueabihf/bin/arm-none-linux-gnueabihf-
Configure and Build the Linux kernel
Now you have to configure the Linux kernel according to your hardware. We have two default configuration at91 SoC inarch/arm/configs
arch/arm/configs/at91_dt_defconfig
arch/arm/configs/sama5_defconfig
arch/arm/configs/sama7_defconfig
-
at91_dt_defconfig: for SAM9 (ARM926) series chips -
sama5_defconfig: for SAMA5 series chips -
sama7_defconfig: for SAMA7 series chips
$ make ARCH=arm sama5_defconfig
  HOSTCC  scripts/basic/fixdep
  HOSTCC  scripts/kconfig/conf.o
  SHIPPED scripts/kconfig/zconf.tab.c
  SHIPPED scripts/kconfig/zconf.lex.c
  SHIPPED scripts/kconfig/zconf.hash.c
  HOSTCC  scripts/kconfig/zconf.tab.o
  HOSTLD  scripts/kconfig/conf
#
# configuration written to .config
#
At this step, you can modify default configuration using the
menuconfig
$ make ARCH=arm menuconfigNow, in the menuconfig dialog, you can easily add or remove some features. Once done, Move to
<Exit> with arrows and press this button hitting the Enter key to exit from this screen.
Build the Linux kernel image, before you build you need set up the cross compile toolchain, check this section.
$ make ARCH=arm

[..]

  Kernel: arch/arm/boot/Image is ready
  Kernel: arch/arm/boot/zImage is ready
Now you have an usable compressed kernel image
zImage.
If you need an uImage you can run this additional step:
make ARCH=arm uImage LOADADDR=0x20008000

[..]

  Kernel: arch/arm/boot/zImage is ready
  UIMAGE  arch/arm/boot/uImage
Image Name:   Linux-6.1.22-linux4microchip-20
Created:      Wed May  4 21:18:58 2022
Image Type:   ARM Linux Kernel Image (uncompressed)
Data Size:    5069704 Bytes = 4950.88 KiB = 4.83 MiB
Load Address: 20008000
Entry Point:  20008000
  Kernel: arch/arm/boot/uImage is ready
make ARCH=arm dtbs

[..]

  DTC     arch/arm/boot/dts/at91-kizbox2-2.dtb
  DTC     arch/arm/boot/dts/at91-kizbox3-hs.dtb
  DTC     arch/arm/boot/dts/at91-nattis-2-natte-2.dtb
  DTC     arch/arm/boot/dts/at91-sama5d27_som1_ek.dtb
  DTC     arch/arm/boot/dts/at91-sama5d27_wlsom1_ek.dtb
  DTC     arch/arm/boot/dts/at91-sama5d2_icp.dtb
  DTC     arch/arm/boot/dts/at91-sama5d2_ptc_ek.dtb
  DTC     arch/arm/boot/dts/at91-sama5d2_xplained.dtb
  DTC     arch/arm/boot/dts/at91-sama5d3_xplained.dtb
  DTC     arch/arm/boot/dts/at91-dvk_som60.dtb
  DTC     arch/arm/boot/dts/at91-gatwick.dtb
  DTC     arch/arm/boot/dts/at91-tse850-3.dtb
  DTC     arch/arm/boot/dts/at91-wb50n.dtb
  DTC     arch/arm/boot/dts/sama5d31ek.dtb
  DTC     arch/arm/boot/dts/sama5d33ek.dtb
  DTC     arch/arm/boot/dts/sama5d34ek.dtb
  DTC     arch/arm/boot/dts/sama5d35ek.dtb
  DTC     arch/arm/boot/dts/sama5d36ek.dtb
  DTC     arch/arm/boot/dts/sama5d36ek_cmp.dtb
  DTC     arch/arm/boot/dts/at91-sama5d4_ma5d4evk.dtb
  DTC     arch/arm/boot/dts/at91-sama5d4_xplained.dtb
  DTC     arch/arm/boot/dts/at91-sama5d4ek.dtb
  DTC     arch/arm/boot/dts/at91-vinco.dtb
  DTC     arch/arm/boot/dts/at91-sama7g5ek.dtb
  DTC     arch/arm/boot/dts/at91-sam9x60_curiosity.dtb

[..]
If the building process is successful, the final images can be found under arch/arm/boot/ directory.
Build Yocto/Poky rootfs from sources
Note that building an entire distribution is a long process. It also requires a big amount of free disk space. The support for Atmel AT91 SoC family is included in a particular Yocto layer:meta-atmel. The source for this layer are hosted on Linux4SAM GitHub accountBuilding environment
A step-by-step comprehensive installation is explained in the Yocto Project Quick BuildPrerequisite
Here are the reference pages for setting up a Yocto building environment: What You Need and How You Get Itgit-lfs to the package requirement list from whichever Linux distribution you use.
For instance, on Ubuntu or debian, these packages need to be installed on your development host:
sudo apt-get install gawk wget git-core git-lfs diffstat unzip texinfo gcc-multilib \
     build-essential chrpath socat cpio python3 python3-pip python3-pexpect \
     xz-utils debianutils iputils-ping python3-git python3-jinja2 libegl1-mesa libsdl1.2-dev \
     pylint3 xterm
Step by step build procedure
meta-atmel layer. This file in the meta-atmel layer repository must be considered as the reference and the following copy can be out-of-sync.
Linux4SAM 2021.04 release, the meta-atmel layer supports Yocto templates, so make sure you create a new build environment using oe-init-build-env
This layer provides support for Microchip microprocessors (aka AT91)
====================================================================

For more information about the Microchip MPU product line see:
http://www.microchip.com/design-centers/32-bit-mpus
Linux & Open Source on Microchip microprocessors:
http://www.linux4sam.org


Supported SoCs / MACHINE names
==============================
Note that most of the machine names below, have a SD Card variant that can be
built by adding an "-sd" suffix to the machine name.
- SAMA5D2 product family / sama5d2-xplained, sama5d2-xplained-emmc, sama5d27-som1-ek-sd, sama5d27-som1-ek-optee-sd, sama5d2-ptc-ek, sama5d2-icp, sama5d27-wlsom1-ek-sd, sama5d29-curiosity-sd
- SAMA5D4 product family / sama5d4ek, sama5d4-xplained
- SAMA5D3 product family / sama5d3xek, sama5d3-xplained
- AT91SAM9x5 product family (AT91SAM9G15, AT91SAM9G25, AT91SAM9X25, AT91SAM9G35 and AT91SAM9X35) / at91sam9x5ek
- AT91SAM9RL / at91sam9rlek
- AT91SAM9G45 / at91sam9m10g45ek
- SAM9X60 / sam9x60ek, sam9x60-curiosity
- SAMA7G5 / sama7g5ek-sd, sama7g5ek-emmc, sama7g5ek-ospi


Sources
=======
- meta-atmel
URI: https://github.com/linux4sam/meta-atmel.git
Branch: kirkstone


Dependencies
============
This Layer depends on :
- poky
URI: https://git.yoctoproject.org/poky
Branch: kirkstone
Tag:yocto-4.0.13

- meta-openembedded
URI: https://git.openembedded.org/meta-openembedded
Branch: kirkstone
Tag/commit:79a6f60dabad9e5b0e041efa91379447ef030482

- meta-arm (for optee components)
URI: https://git.yoctoproject.org/meta-arm
Branch: kirkstone
Tag:yocto-4.0.1

Build procedure
===============

0/ Create a directory
mkdir my_dir
cd my_dir

1/ Clone yocto/poky git repository with the proper branch ready
git clone https://git.yoctoproject.org/poky && cd poky && \
git checkout -b kirkstone yocto-4.0.13 && cd -

2/ Clone meta-openembedded git repository with the proper branch ready
git clone git://git.openembedded.org/meta-openembedded && \
cd meta-openembedded && git checkout -b kirkstone 79a6f6 && cd -

3/ Clone meta-atmel layer with the proper branch ready
git clone https://github.com/linux4sam/meta-atmel.git -b kirkstone

4/ Clone meta-arm layer with the proper branch ready
git clone https://git.yoctoproject.org/meta-arm && cd meta-arm && \
git checkout -b kirkstone yocto-4.0.1 && cd -

5/ Enter the poky directory to configure the build system and start the build process
cd poky
If not created yet, add a new "build-microchip" directory:
mkdir build-microchip
Else, if it's the first time you use Yocto Project templates, and if the
build-microchip directory remains from a previous use, we advise you to start
from a fresh directory. Keep your build-microchip/conf/local.conf file for
reference.

6/ Inside the .templateconf file, you will need to modify the TEMPLATECONF
variable to match the path to the meta-atmel layer "conf" directory:
export TEMPLATECONF=${TEMPLATECONF:-../meta-atmel/conf}

7/ Initialize build directory
source oe-init-build-env build-microchip

8/ To build a small image provided by Yocto Project:
[MACHINE=] bitbake core-image-minimal

Example for sama5d2-xplained-sd SD card image:
MACHINE=sama5d2-xplained-sd bitbake core-image-minimal

9/ To build the microchip image with no graphics support:
[MACHINE=] bitbake microchip-headless-image

Example for sama5d2-xplained-sd SD card image:
MACHINE=sama5d2-xplained-sd bitbake microchip-headless-image

10/ To build the microchip image with graphics support (EGT):
[MACHINE=] bitbake microchip-graphics-image

Example for sama5d2-xplained-sd SD card image:
MACHINE=sama5d2-xplained-sd bitbake microchip-graphics-image

Typical bitbake output
======================
Build Configuration:
BB_VERSION           = "2.0.0"
BUILD_SYS            = "x86_64-linux"
NATIVELSBSTRING      = "universal"
TARGET_SYS           = "arm-poky-linux-gnueabi"
MACHINE              = "sam9x60-curiosity-sd"
DISTRO               = "poky-atmel"
DISTRO_VERSION       = "4.0.13"
TUNE_FEATURES        = "arm armv5 thumb dsp"
TARGET_FPU           = "soft"
meta
meta-poky
meta-yocto-bsp       = "heads/kirkstone-4.0.13:e51bf557f596c4da38789a948a3228ba11455e3c"
meta-oe
meta-networking
meta-webserver
meta-python
meta-initramfs       = "79a6f60dabad9e5b0e041efa91379447ef030482:79a6f60dabad9e5b0e041efa91379447ef030482"
meta-atmel           = "heads/linux4microchip-2023.10-rc3:c94eec92946f6469d8adb30490d26f55021e1299"
meta-multimedia      = "79a6f60dabad9e5b0e041efa91379447ef030482:79a6f60dabad9e5b0e041efa91379447ef030482"
meta-arm
meta-arm-toolchain   = "heads/yocto-4.0.2:96aad3b29aa7a5ee4df5cf617a6336e5218fa9bd"

Contributing
============
To contribute to this layer you should submit the patches for review to:
the github pull-request facility directly or the forum. Anyway, don't forget to
Cc the maintainers.

Microchip Forum:
https://www.microchip.com/forums/f542.aspx

for some useful guidelines to be followed when submitting patches:
http://www.openembedded.org/wiki/How_to_submit_a_patch_to_OpenEmbedded

Maintainers:
Hari Prasath G E
Nicolas Ferre

When creating patches insert the [meta-atmel] tag in the subject, for example
use something like:
git format-patch -s --subject-prefix='meta-atmel][PATCH'
Recent FAQ
- Sama5d3xek
-
• Convert SAMBAScript: SAM-BA API revisions. (SAM-BA)
• Crypto Config: How to configure Crypto driver. (Kernel, linux-3.18-at91, linux-4.1-at91, linux-4.4-at91, linux-4.9-at91, linux-4.14-at91, linux-4.19-at91, linux-5.4-at91, linux-5.10-at91, linux-5.15-mchp, linux-6.1-mchp)
• USBGadget Config: Configure AT91 USB Gadget on Linux and Endpoint order management (composite USB). (Kernel, linux-4.4-at91, linux-4.9-at91, linux-4.14-at91, linux-4.19-at91, linux-5.4-at91, linux-5.10-at91, linux-5.15-mchp, linux-6.1-mchp)
• Pwm Faq: PWM Driver. (Kernel, linux-3.10-at91, linux-3.18-at91, linux-4.1-at91, linux-4.4-at91, linux-4.9-at91, linux-4.14-at91, linux-4.19-at91, linux-5.4-at91, linux-5.10-at91, linux-5.15-mchp, linux-6.1-mchp)
• Using Atmel DRMDriver: Using Atmel KMS/DRM LCD driver. (Kernel, linux-3.18-at91, linux-4.1-at91, linux-4.4-at91, linux-4.9-at91, linux-4.14-at91, linux-4.19-at91, linux-5.4-at91, linux-5.10-at91, linux-5.15-mchp, linux-6.1-mchp)
• External Component On EBI: Connecting an external component on the External Bus Interface. (Kernel, linux-4.14-at91, linux-4.19-at91, linux-5.4-at91, linux-5.10-at91, linux-5.15-mchp, linux-6.1-mchp)
• SDCard Boot Notice: How to boot up the board from SD card. (AT91Bootstrap)
• Using Isi 6: Using ISI with Linux4sam 6.0 and Kernel 4.14 and later. (Kernel, linux-4.14-at91, linux-4.19-at91, linux-5.4-at91, linux-5.10-at91, linux-5.15-mchp, linux-6.1-mchp)
• Iio Adc Driver: Adc IIO driver introduction. (Kernel, linux-3.10-at91, linux-3.18-at91, linux-4.1-at91, linux-4.4-at91, linux-4.9-at91, linux-4.14-at91, linux-4.19-at91, linux-5.4-at91, linux-5.10-at91, linux-5.15-mchp, linux-6.1-mchp)
• Pmecc Configure: About PMECC configuration. ()
• Build Linux Ssl: Kernel Compilation Error related to OpenSSL. (Kernel)
• Using Isi: How to use the Image Sensor Interface. (Kernel, linux-3.18-at91, linux-4.1-at91, linux-4.4-at91, linux-4.9-at91)
• Driver Model In UBoot: How to enable U-Boot driver model, using Sama5d2Xplained as an example. (U-Boot)
• Gui Solutions: Presentation of some GUI solutions. (YoctoProject)
• Yocto Project FAQ: Some Yocto Project FAQ entries. (YoctoProject)
• Uboot Fit Image: How to use the FIT image. (U-Boot)
r3 - 17 Sep 2015 - 15:09:48 - NicolasFerre
Linux4SAM
Open source solutions ApplicationsBoards
- SAMA5D29 Curiosity
- SAM9X60 Curiosity
- SAMA7G5-EK
- SAMA5D2-ICP
- SAMA5D27 WLSOM1 EK
- SAM9X60-EK
- SAMA5D27 SOM1 EK
- SAMA5D2 PTC EK
- SAMA5D2 Xplained
- SAMA5D3 Xplained
- SAMA5D4 Xplained
- Older boards
FAQ
Useful links
- Microchip Microprocessors forums
- AT91 Community (archive)
- Microchip
- Linux4Microchip on GitHub
- Linux4SAM on GitHub
NAVIGATION
Copyright © by the contributing authors. All material on this collaboration platform is the property of the contributing authors.
Linux® is the registered trademark of Linus Torvalds in the U.S. and other countries.
Microchip® and others, are registered trademarks or trademarks of Microchip Technology Inc. and its subsidiaries. ![]()
Arm® and others are registered trademarks or trademarks of Arm Limited (or its affiliates). Other terms and product names may be trademarks of others.
Ideas, requests, contributions ? Connect to LinksToCommunities page.